If you’ve ever struggled with cooking rice just right, you’re definitely not alone. I remember the first time I used my Black Decker 3-cup rice cooker—I wasn’t quite sure what to expect. But honestly, once you get the hang of it, it’s one of those kitchen gadgets that makes life so much easier. This little cooker is perfect if you don’t want to fuss over complicated settings or huge batches of rice. Whether you’re cooking for one or two people, it’s just the right size.
So, let’s talk about how to get the best out of your Black Decker 3-cup rice cooker. I’ll share everything from the basics to some tips I’ve picked up along the way, plus a few troubleshooting tricks that might save you some headaches.
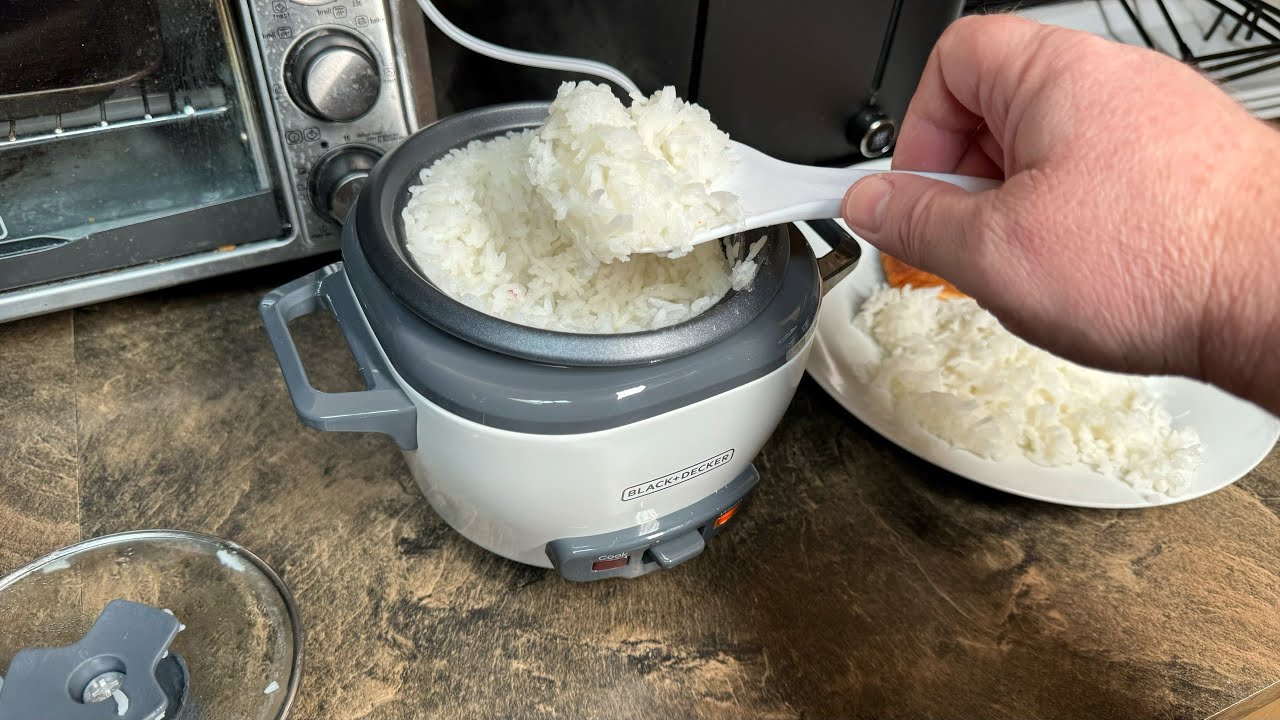
First off, the Black Decker 3-cup rice cooker is pretty straightforward. It’s designed to cook up to cups of uncooked rice, which turns into about cups once it’s done. That’s usually enough for a couple of meals or a small family dinner. The cooker has a non-stick bowl, which I love because it means less scrubbing later. Plus, the glass lid lets you peek inside without losing steam—super handy.
Now, onto the actual cooking. Here’s how I usually do it:
You start by measuring your rice. The cooker comes with a measuring cup, which is great because it’s calibrated for the bowl. I always rinse my rice under cold water until the water runs clear—this little step helps keep the rice from getting sticky or clumpy. If you skip rinsing, you might end up with a gummy mess, and nobody wants that.
Once rinsed, you put the rice in the bowl and add water. The amount of water depends on the type of rice you’re using. For regular white rice, I usually do cup rice to 1. cups water. Brown rice needs more water—about twice as much—and takes longer to cook. The bowl often has water level markings, which is super helpful if you’re unsure.
Dry the outside of the bowl before placing it in the cooker. This is important because any water on the outside can cause electrical issues. Then, close the lid, plug it in, and press the switch down. The light will turn on, and the cooker starts working its magic.
One thing I’ve learned is to resist the temptation to open the lid while it’s cooking. It’s tempting to check, but lifting the lid lets steam out and can mess with the cooking process. Once it’s done, the cooker automatically switches to “keep warm” mode, which is perfect if you’re not ready to eat right away.
I usually let the rice sit for about to minutes after it switches to keep warm. This resting time helps the rice finish steaming and gives it a better texture. Then, I fluff it with the rice paddle that comes with the cooker. Fluffing is key—it separates the grains and makes the rice light and fluffy instead of mushy.
Here’s a quick water-to-rice guide I keep handy:
-
White rice: cup rice to 1. cups water
-
Brown rice: cup rice to cups water
-
Jasmine rice: cup rice to 1. cups water

-
Basmati rice: cup rice to 1. cups water
-
Sushi rice: cup rice to 1. cups water
These ratios work well most of the time, but sometimes you have to tweak them a bit depending on your altitude or how fresh your rice is.
A few other tips I’ve picked up:
-
Always rinse your rice well. It really makes a difference.
-
Use the measuring cup that came with the cooker. It’s designed for the bowl’s size.
-
Don’t open the lid mid-cook unless you want to risk uneven rice.
-
If you want to get fancy, try cooking rice in broth instead of water or add a pinch of salt or a little oil for flavor.
-
If your rice ends up too sticky or mushy, try reducing the water next time.
Cleaning the cooker is pretty simple too. Just unplug it first—safety first! The non-stick bowl comes out easily, so I wash it with warm soapy water and a soft sponge. Avoid anything abrasive because it can damage the coating. The lid and steam vent can be wiped down with a damp cloth. Just don’t submerge the base in water—trust me, it’s an electrical appliance, so water and electronics don’t mix. Dry everything thoroughly before putting it back together.

Sometimes things don’t go perfectly, and that’s okay. Here are some common issues and what you can do:
-
If your rice is undercooked, maybe you didn’t add enough water or the cooker lost power. Try adding a bit more water and restarting the cooker.
-
If the rice is mushy, that usually means too much water or it cooked too long—cut back on water next time.
-
If the cooker won’t turn on, check the outlet or the power switch. If it still doesn’t work, you might need to contact customer support.
-
Rice sticking to the bowl? Make sure you rinse the rice well and use the plastic paddle, not metal utensils.
-
If the keep-warm function isn’t working, it could be a faulty thermostat. That might need professional help.
I get asked a lot of questions about this cooker, so here are some quick answers:
Can I cook other grains like quinoa or barley?
Yes, definitely! Just adjust the water and cooking time. Quinoa usually needs less water, barley more. It’s a bit of trial and error.
How long does it take to cook rice?
White rice takes about 15- minutes. Brown rice is longer—around 40- minutes.
Is it okay to leave the cooker on keep-warm for hours?
It’s safe for a few hours, but I wouldn’t leave it on all day. Four to five hours max is a good rule of thumb.
Can I steam veggies in this cooker?
Some models come with a steaming basket. If yours does, you can steam veggies while the rice cooks underneath. It’s a great way to make a quick meal.
What if it smells burnt?
Unplug it immediately. Check if rice is stuck on the heating plate or if there’s residue. Clean it well before using again.
Why do I keep coming back to the Black Decker 3-cup rice cooker? It’s simple, reliable, and doesn’t take up much space. I don’t have to babysit it, and it delivers consistent results. The keep-warm feature is a lifesaver when I’m running late or distracted.
In the end, using the Black Decker rice cooker is about getting comfortable with the process. Once you know your rice types and water ratios, it’s smooth sailing. This little appliance has saved me countless times when I needed a quick, no-fuss side dish or base for a meal.
So, if you’re looking to make your rice-cooking life easier, follow this easy guide. You’ll be surprised how much better your rice can taste when you get the basics right. Plus, it frees up your time and energy for other things—like enjoying your meal!

Remember, cooking rice is part science, part art, and a little bit of patience. But with your Black Decker 3-cup rice cooker, you’re well on your way to perfect rice every time.