
Cooking rice might seem simple, but anyone who’s ever ended up with soggy or burnt rice knows it’s not always foolproof. That’s where the Black & Decker rice cooker comes in handy. It’s one of those kitchen gadgets that really takes the guesswork out of making rice. I remember when I first got mine, I was a bit intimidated by the buttons and settings—turns out, it’s way easier than I thought. This guide will walk you through everything you need to know to get the best results from your Black & Decker rice cooker, whether you’re a beginner or just want to make sure you’re doing it right.
Getting to Know Your Black & Decker Rice Cooker
Before you start tossing rice and water in, it helps to understand what you’re working with. Black & Decker rice cookers come in different sizes—some hold cups of rice, others or even cups. But no matter the size, they usually have the same basic parts: a non-stick cooking bowl, a lid that seals in the steam, a simple control switch or lever, and a couple of indicator lights that tell you when it’s cooking or warming. Some models even come with a steamer tray, which is a neat little bonus if you want to steam veggies or fish while your rice cooks.
Step 1: Measure Your Rice
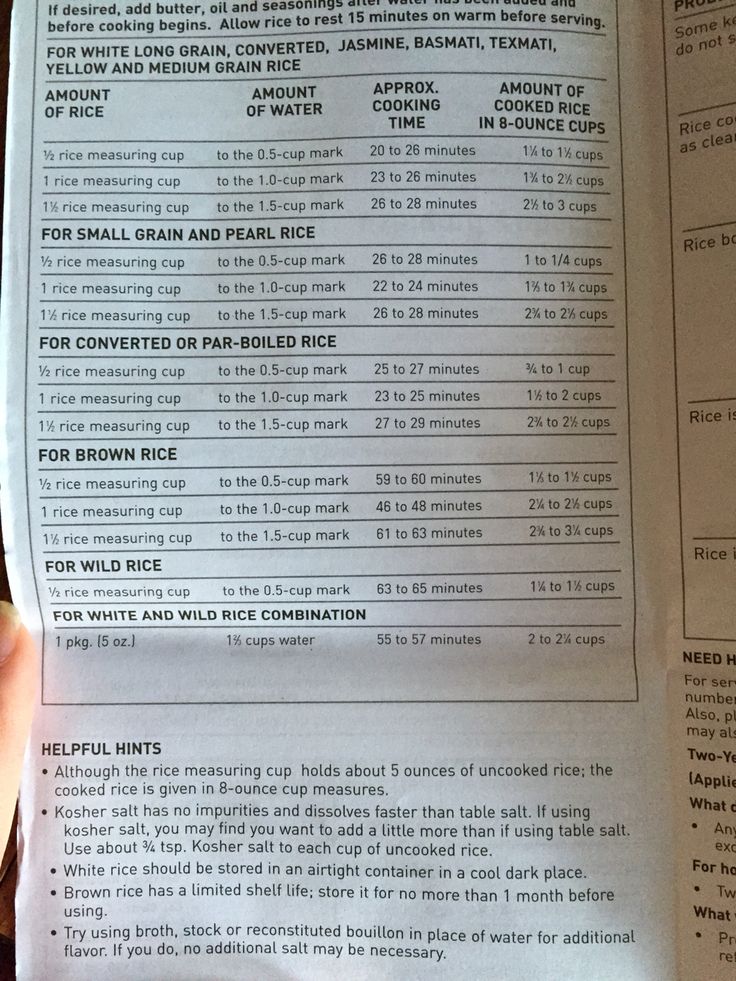
One of the first things I learned is that measuring the rice properly makes a big difference. Use the measuring cup that came with your cooker or just a regular cup. For white rice, a good rule of thumb is about cup of rice to cups of water. But depending on how much rice you want, here’s a quick little table:

| Rice | Water |
|---|---|
| cup | cups |
| cups | cups |
| cups | 3. cups |
| cups | cups |
Brown rice and other types need a bit more water and a longer cook time, but we’ll get to that later.
Step 2: Rinse Your Rice
This might feel like a hassle, but rinsing your rice really helps. I usually put the rice in a sieve and rinse it under cold water until it runs clear. This washes away extra starch that can make your rice sticky or mushy. Just don’t rinse the rice right in the cooking bowl—it can mess up the non-stick coating over time.
Step 3: Add Rice and Water
Once rinsed, put the rice in the cooking bowl and add the right amount of water. I like to smooth out the rice with the back of a spoon to make sure it’s even. It helps it cook more uniformly.
Step 4: Set It Up
Pop the bowl back into the cooker base and close the lid firmly. You want it sealed so the steam stays inside. Plug it in, and you’ll see the warm light come on—that just means it’s powered and ready.
Step 5: Start Cooking
Push down the control switch or lever to start cooking. The cook light will come on, and the rice cooker will do its magic. One of the best things about these cookers is they switch automatically to “warm” when the rice is done, so you don’t have to worry about burning it.
Step 6: Let It Rest
Even after the cooker switches to warm, I recommend letting the rice sit for about minutes with the lid closed. This resting time lets the steam finish the job, making your rice fluffier and tastier.
Step 7: Fluff and Serve
Before serving, use the rice paddle to gently fluff the rice. This helps separate the grains and lets out any trapped steam.
More Than Just Rice: Cooking Soups, Stews, and Steaming
Did you know your Black & Decker rice cooker can do more than just rice? I’ve used mine to make simple soups and stews. Just toss your ingredients in the bowl, close the lid, and start cooking. Just keep an eye on it because unlike rice, the cooker won’t automatically switch to warm until all the liquid boils off.
If your model has a steamer tray, you can steam veggies or fish while your rice cooks below. It’s a great way to make a full meal with minimal cleanup.
Cleaning and Taking Care of Your Cooker
Keeping your rice cooker clean is key to making it last. Always unplug it and let it cool before cleaning. The cooking bowl can be washed with warm soapy water—just be gentle to keep that non-stick surface happy. Wipe the inside of the base with a damp cloth, but never dunk it in water. Also, don’t forget to clean the lid and steam vent regularly so nothing gets clogged.

Safety Tips to Keep in Mind
- Never use the cooker without the cooking bowl inside.
- Don’t immerse the base, cord, or plug in water.
- Keep the power cord away from heat and sharp edges.
- Place the cooker on a flat, stable surface with good ventilation.
- Keep kids and pets away while it’s working.
- Don’t use it outdoors or near flammable stuff.
- Always watch it when cooking soups or stews.
Tips for Perfect Rice Every Time
- Stick to the right rice-to-water ratio, but feel free to tweak it to your taste.
- Rinse your rice well to avoid mushiness.
- Let the rice rest after cooking for fluffier texture.
- Don’t open the lid while it’s cooking—patience pays off!
- Use the rice paddle to fluff the rice, not a fork or metal utensil.
Popular Black & Decker Rice Cooker Models
| Model | Capacity | Features |
|---|---|---|
| RC503 | cups | Compact, ceramic bowl (PFAS-free) |
| RC506 | cups | Simple one-switch operation |
| RC650 | cups | Includes steamer tray |
| RC1050 | cups | Larger capacity, multi-use |
FAQs
Q: Can I cook brown rice in my Black & Decker rice cooker?
A: Absolutely! Brown rice just needs more water and time—usually about 2. cups of water per cup of rice. Some models might have a brown rice setting, but if not, just let it cook fully and don’t rush.
Q: How do I stop rice from sticking to the bowl?
A: Rinse the rice well, use the right water amount, and avoid scraping the bowl with metal utensils. The rice paddle that comes with the cooker is your best friend here.
Q: Can I cook other grains or foods?
A: Yes! Quinoa, oatmeal, soups, stews, and steamed veggies work great. Just check water ratios and cooking times for each.
Q: What if my rice cooker doesn’t switch to warm?
A: Make sure the bowl is sitting right on the heating plate. The cooker switches to warm only after the water is absorbed or boiled off. If it still doesn’t switch, check the power or contact support.
Q: How do I clean the steam vent?
A: Wipe it with a damp cloth or wash it with warm soapy water if removable. Dry it fully before putting it back.
Wrapping It Up
Using your Black & Decker rice cooker doesn’t have to be complicated. With a little practice and these simple steps, you’ll be making perfect rice every time. Plus, it’s great to know you can cook so much more than rice with it. Just remember to be patient, follow the water ratios, and take care of your cooker—and it’ll reward you with delicious meals and less kitchen stress. If you ever get stuck, your user manual or customer support is there to help. Happy cooking!