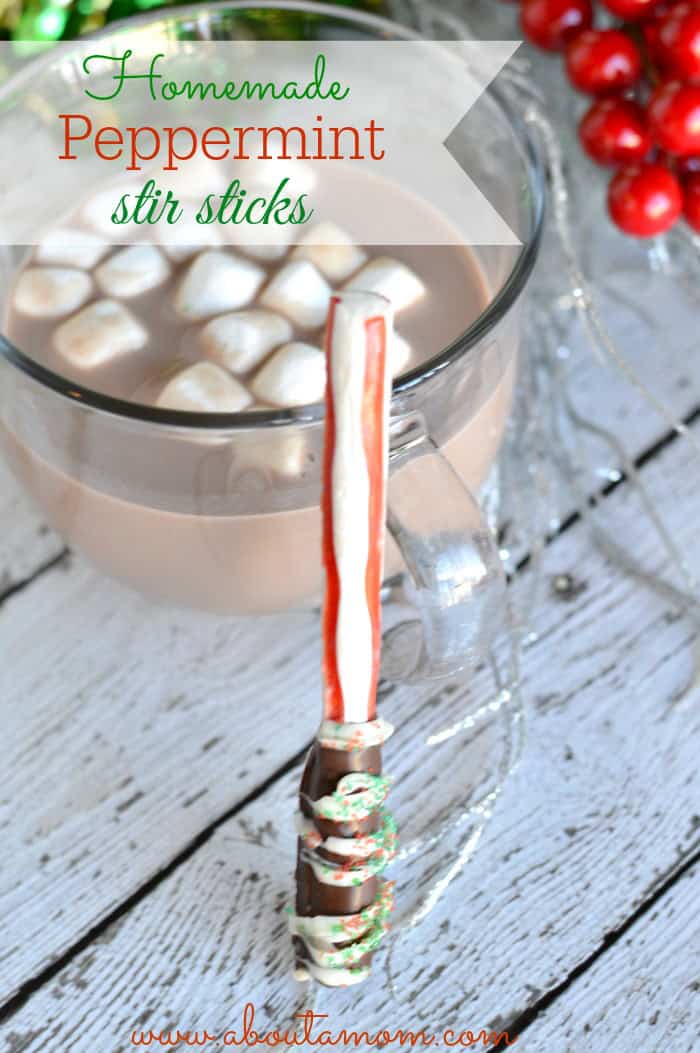
Chocolate dipped peppermint sticks—there’s just something so festive and comforting about them, isn’t there? Maybe it’s the cool, minty bite paired with that rich, smooth chocolate, or the way they turn a hot cup of cocoa or coffee into a little moment of joy. Honestly, once you’ve tried making these yourself at home, it’s hard to go back to store-bought versions. They’re simple to make, pretty fun actually, and you get all the freedom to customize every little detail. Let me walk you through it.
If you landed here wondering “how on earth do I make chocolate dipped peppermint sticks taste amazing,” you’re in the right place. I’ll cover everything: what ingredients work best, how to melt and dip without a mess, sprinkles and decorating tips, even some creative twists and packaging ideas if you want to give them as gifts. And yes, there will be answers to all those common questions that pop up, plus a quick nutrition rundown because hey, we all like to know what’s going into our sweet treats.
So, first things first: let’s talk supplies.

You’ll want good peppermint sticks, of course—or classic candy canes if you prefer. Just make sure they’re not cracked or sticky. A fresh, strong peppermint flavor really makes a difference. For the chocolate, I’m a fan of semi-sweet or milk chocolate because they melt smoothly and taste just right—not too bitter or sickly sweet. But if you’re feeling fancy, dark or white chocolate will do too. Honestly, I’ve had fun experimenting with layering white and dark chocolate for a marbled effect. It’s easier than it looks—and impresses every time.
Don’t forget some toppings if you want! Crushed peppermint candies, colorful sprinkles, a handful of mini chocolate chips, or even tiny marshmallows work great. These little details turn simple sticks into something special.
As for tools, nothing too wild here. Just a microwave-friendly bowl (or a double boiler if you’re old school), a spatula, some wax paper to lay your finished sticks on, and maybe some tongs if you want to keep your hands spotless.
Alright, let’s get into the actual dipping.
Spread out your wax paper on a tray or counter. Melt your chocolate slowly—if you go too fast in the microwave, it’ll seize up and you’ll be starting over. I promise, stirring every 20- seconds helps a ton. Once smooth and glossy, grab a peppermint stick, hold on tight to one end, and dip it into the chocolate. How much you dip is up to you—halfway? Full dip? I usually go for about three-quarters because then you still have some peppermint stick to hold onto. Let the excess chocolate drip off a little so it’s not gloppy.
Before the chocolate hardens—because that’s the magic window!—sprinkle on your toppings. I love crushed peppermint for that extra zing and texture. Sometimes I go classic with red and green holiday sprinkles, especially for gifts. The marshmallows might sound weird, but when they melt slightly in warm drinks stirred with the stick? So good.
Place your dipped sticks carefully on the wax paper and let them firm up. You can leave them out at room temp, but I usually pop them in the fridge for 10- minutes if I’m in a rush.
One thing I find pretty cool: these are such a small thing but can have a big impact. Imagine serving coffee at your holiday brunch with one of these stuck in the cup, melting slowly and infusing that perfect mint-chocolate combo. Or packaging a set wrapped up in clear cellophane tied with a bow. People will think you went to a fancy chocolatier—promise.
Here’s a quick little table comparing the common chocolate types because I know a lot of people ask about this:
Chocolate Type — Flavor — Melting Ease — When to Use

Semi-Sweet — Balanced sweet and bitter — Melts easily — Everyday dipping, versatile
Milk Chocolate — Creamy and sweet — Very easy melting — Kid-friendly, festive look
Dark Chocolate — Rich, less sweet — Moderate — For grown-up treats, intense flavor
White Chocolate — Sweet, buttery — Easy but fragile — Great for drizzles and decoration
And yes, I’m aware these are treats and not exactly health food, but it’s always good to know what you’re into:
Approximate Nutrition per Stick:
Calories: ~110
Sugar: 14g
Fat: 4g (Saturated: 2g)
Carbs: 17g
Sodium: 12mg
So, as with any dessert, enjoy in moderation. But hey, you’re getting peppermint and some calcium too!
Before I forget, here are some FAQs that’ve come up with friends and readers:
Q: Can I use broken peppermint candies instead of sticks?
A: You can try, but they’re tricky to hold and dip since they have no stick. Plus, dipping peppermint sticks makes for a much nicer stirring experience.
Q: What’s the best chocolate—chips or bars?
A: Chips are easier for melting evenly, but bars can work great if chopped finely. Avoid chocolate that’s too sweet or too “cheap”—quality matters.
Q: How do I stop the chocolate from seizing?
A: Water is the nemesis here. Make sure your bowls and utensils are dry, and stir frequently while melting slowly.
Q: Can these be stored?

A: Yes, place them in an airtight container in a cool, dry spot. Refrigerator works too but watch out for condensation on the chocolate.
Q: Are they gluten-free?
A: Most peppermint sticks and chocolates are gluten-free, but always double-check your packaging if gluten is a concern.
To wrap this up: making chocolate dipped peppermint sticks is one of those feel-good, simple pleasures. It doesn’t take long, doesn’t demand fancy gadgets, and you get to tailor everything to your taste and style. Plus, they spread smiles faster than almost any other treat during the holiday season.
So, grab some peppermint sticks, melt that chocolate, and start dipping. Share them with your family, friends, or maybe just savor a few quietly by the fireplace. Either way, they’re bound to become a new favorite ritual. Enjoy!