
If you’re like me, having a reliable rice cooker in the kitchen is almost a lifesaver. The Aroma Rice and Grain Cooker is one of those handy gadgets that just makes life simpler—especially when you want fluffy, perfectly cooked rice without the hassle of babysitting the pot. But let’s be honest, even with these gadgets, nailing the perfect rice can sometimes feel like a bit of a mystery. So, here’s a down-to-earth, step-by-step guide that should help you get the best out of your Aroma cooker and avoid some of those frustrating moments.
First off, a little about the Aroma cooker itself. It’s designed to be straightforward and user-friendly, but depending on the model you have, the controls might vary from a simple switch to a digital interface with multiple functions. What I love about it is how versatile it is—not just for white rice, but also for brown rice, quinoa, and even steaming veggies or soups if you have the right model.
What you’ll need: Your Aroma cooker (obviously!), a rice measuring cup (should come with the cooker), a spatula or rice paddle, filtered water, and whatever grain you’re cooking. Plus, a strainer for rinsing your rice clean—that step is key, trust me.
Let’s break it down:
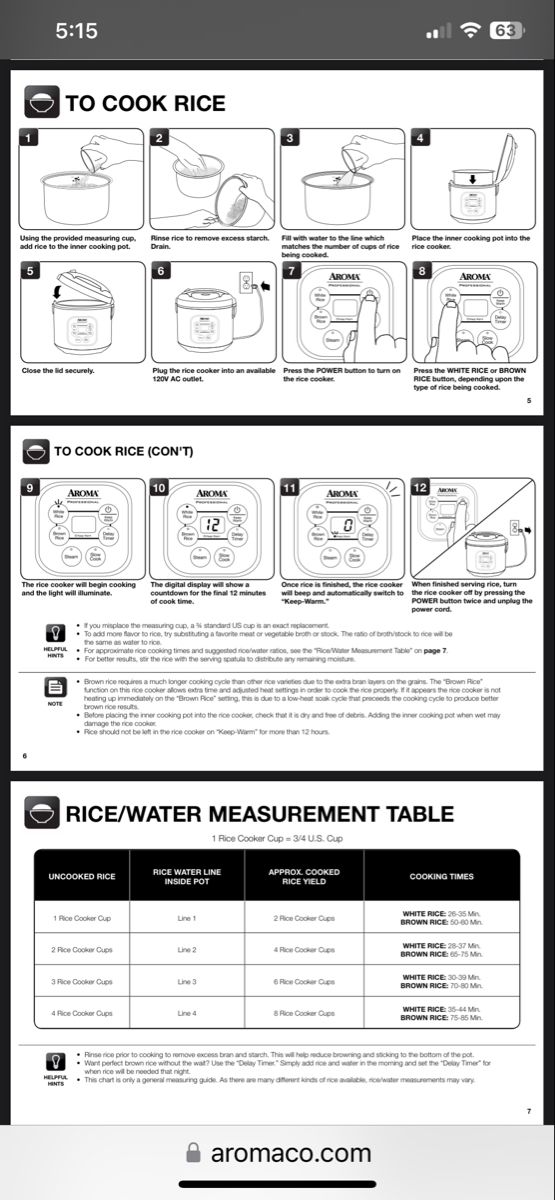
1. Measure your rice carefully. Most Aroma cookers come with their own measuring cups—not the usual kitchen measuring cup size, so it’s important to use the one that comes with the cooker for best results. Usually, one cup is enough for about two servings.
2. Rinse the rice, rinse it well. This is probably the most overlooked step. Rinse your rice under cold water until it runs clear. You’ll notice the water starts out cloudy but gets clearer with each rinse. This removes the extra starch that makes your rice sticky or clump together more than you want.
3. Put the rinsed rice into the inner pot. Spread it so it’s even. This helps it cook uniformly—no crunchy bits hiding at the bottom!
4. Add water. This is where a lot of people go wrong. The inner pot has little water level lines corresponding with the number of cups of rice you added—follow those exactly. For example, if you put in cups of rice, fill to the water line marked ‘2.’ It’s super easy once you get used to it. If you want the hard facts:
| Rice Quantity (cups) | Water Level Mark | Approximate Water (ml) |
|---|---|---|
| 1 | 1 | ml ( cup) |
| 2 | 2 | ml ( cups) |
| 3 | 3 | ml ( cups) |
5. Close the lid properly. I can’t stress enough how much difference this makes. If the lid isn’t sealed well, steam escapes and the rice won’t cook evenly. It’s frustrating, trust me—I learned this the hard way!
6. Start cooking. For the basic models, just push down the cook switch and wait for the light to turn on. It’ll do its thing. For the fancier digital models, you select the setting (say, white rice or brown rice) and hit start. Some models even let you set a timer, so you can prep in advance.
7. Let it finish and switch to warm. Once the rice is done, the cooker switches to keep-warm mode automatically, so your rice doesn’t sit there getting cold. If you’re using a non-digital model, you’ll notice the cook button pops up on its own to indicate it’s finished.
8. Rest the rice for minutes. It might be tempting to dig in straight away, but leaving the rice to sit for a bit with the lid closed helps every grain absorb any lingering moisture for better texture.
9. Fluff gently. Use your spatula or rice paddle to separate the grains before serving. This keeps the rice light and fluffy instead of clumped together.
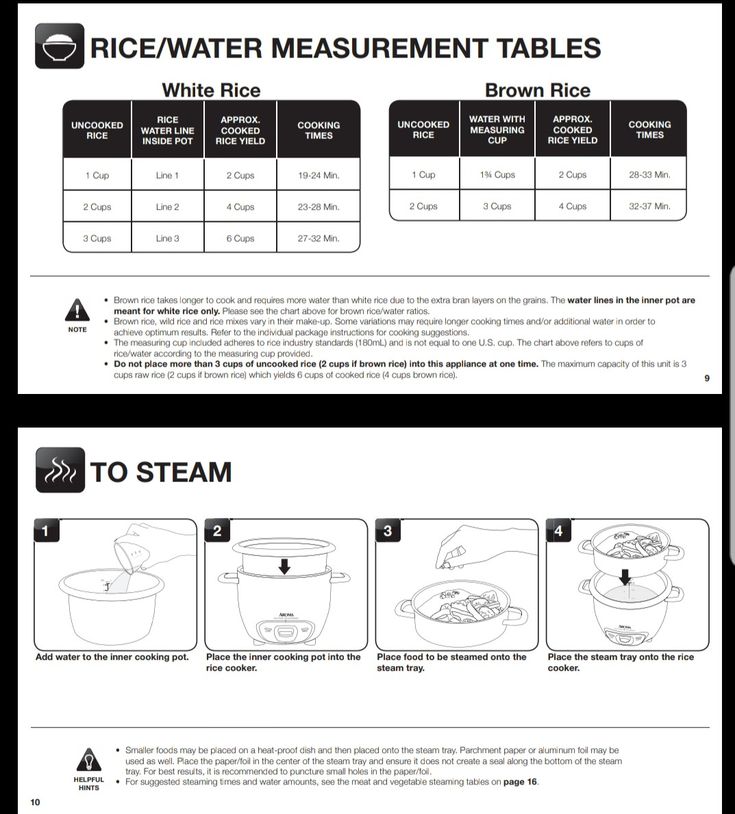
Now, if you’re wondering about other grains or cooking modes, the Aroma cooker handles more than just white rice. Brown rice, for example, takes longer and needs more water—about cup of rice to cups of water is a good rule. If your cooker has a brown rice setting, use it for best results.
Want to steam something? Most higher-end Aroma models come with a steaming basket. You just pour around cups of water into the pot, place your veggies or fish on the tray, close the lid, and set the steam mode. Steaming times vary, but veggies usually take between 5- minutes, depending on the type and amount.
Cleaning your cooker: I always make sure to unplug the cooker first. Cleaning is easy but important—wash the inner pot, lid, and steam tray in warm, soapy water. Don’t use abrasive scrubs, or you risk damaging the non-stick surface. Also, don’t forget to wipe down the outside and check for any food bits clogging the steam vent.
Encountering issues? Here’s a quick cheat sheet from my experience:
| Problem | Cause | Fix |
|---|---|---|
| Rice too sticky | Too much starch or water | Rinse rice thoroughly; reduce water next time |
| Rice undercooked | Not enough water; uneven cooking | Add more water; level the rice |
| Cooker won’t start | Power issue or faulty plug | Check power source; examine plug |
| Cooker switches to warm early | Lid not shut properly | Make sure lid is closed tightly |
| Excessive steam escaping | Misaligned/damaged lid | Inspect/realign lid; replace if cracked |
Just a few FAQs that might help:
Q: Can I cook quinoa or other grains?
A: Absolutely. Just adjust water; quinoa usually needs ratios similar to rice, sometimes a bit less.
Q: Rinsing rice—is it really necessary?
A: I’d say yes. It really helps with texture and stops rice from being mushy or too sticky.
Q: How do I keep leftover rice fresh?
A: Cool it quickly, put it in an airtight container, then refrigerate. Use within about days.
Q: What if my rice burns at the bottom?
A: Use the right water amount, rinse your rice, and avoid opening the lid mid-cook to keep the steam inside.
Honestly, once you get the hang of your cooker, it’s a huge time saver and stress reliever. Little things like using filtered water, not overfilling the pot, and fluffing the rice immediately can make a big difference. Also, soaking brown rice for minutes before cooking helps too—it softens the grains so it cooks evenly without too much hassle.
In the end, your Aroma Rice and Grain Cooker is there to take the guesswork out of cooking grains. Follow these tips and you’ll avoid those frustrating “too damp” or “too crunch-y” rice moments. And trust me, there’s nothing better than a bowl of perfectly cooked rice, steaming and fluffy, ready to complement your meal. Happy cooking!